Saturday, January 28, 2017

Besting #204 Bad Dudes (EI31.9A)

Side note: post was supposed to go out early release to backers but accidentally went to general release.  We apologize to the backers, but it got a lot of attention in the short time that it was out, so we think it is best at this point to just keep it out there.  We'll fix this for future posts.

First part is same idea as #45 but on a smaller scale: assess and repair damage.  Sample as received:


Close up:


The chip has been opened and 5 pins are missing at the bottom.  Bond wires are in general disarray and the die is dirty:


However, no obvious silicon damage.  After ultrasonic clean:


This allowed a closer inspection under a higher power microscope that also revealed no damage.

Among the 5 broken wires are 3 address bits, reset, and one from P3.  P3 is unused during readback, so we really only need to fix 4 of them.

Start by rebuilding leadframe.  First, epoxy everything still intact:


This helps prevents damage when inserting into a socket.  Next, inserted into a socket to improve mechanical stability and provide a template for the new pins:


Then a sacrificial 8751 was stripped of its pins (see 45 post for process details) and epoxied into the leadframe:


During wire attach, previous work put epoxy on the die surface to use as a fine palate.  Although this is likely harmless, can possibly scratch the die and/or short something out.  Decided to put the security fuse UV mask on early to double as a mask and a protective barrier:


Wires are also soldered up now:


And add epoxy:


After cure tried dumping and still getting address failures with several bits stuck at 0.  Although pin resistance values are not in spec to other similar pins, they are close.  Suspect that epoxy got too close to die edge and is doing some sort of soft short.

Used WFNA (white fuming nitric acid) to dissolve epoxy and try again:


Re-applying epoxy:


And address bits are now solid!

However, this whole time data bits have also been flaky.  At least one wire was broken and was repaired with silver conductive epoxy.  However, we are unable to determine why data lines are flaky.

Fortunately, dumps were taken at many steps of this process.  In fact, at least three dumps had all address bits correct but varying data bits bad.  Several of these dumped the same twice meaning the data is incomplete but reasonably stable.

Wrote a small bit of code to combine the good bits from each dump.  This also showed that dumps agree on bits common between them.

Next, popped combined dump into a disassembler to verify reasonable control flow.  Cursory check revealed no errors.  Finally, dump was simulated and showed no obvious issues.

In conclusion, 204 was salvageable but was a bit of a puzzle to piece together.  Several verification methods indicate its probably good.  Hopefully this is the last of the samples requiring such repairs.

Enjoy this post?  Please support us on Patreon or Indiegogo!

Wednesday, January 25, 2017

Conquering PIC16C57 #234, 241, 242

In this edition we look at obtaining the PIC16C57 ROM for the following:
  • 234: World Beach Volleyball
  • 241: Ultimate Mortal Kombat
  • 242: World Rampage
The following showed data loss at receipt and, as a result, were not processed successfully:
  • 139: Invasion (some bits)
  • 227: Action Hollywood (some bytes)
241/242 are found as U64 on Midway Wolf Unit game boards.  Board repair logs indicate this part commonly failed.  Extracted MCU ROMs can now be used to create replacement parts.

These chips are a bit unusual in several ways.  First, they use 12 bit words.  Second, code protection intentionally leaks a 4 bit xor of the 12 bit words.  Therefore, even with protection enabled you can glean quite a bit about the firmware.  We went with a UV attack, but this might also make them vulnerable to programming one nibble at a time and observing the xor difference.  Anyway, all chips are dumped as received ("protected dump").

Same idea as the 8751: mask the main EPROM while keeping the security fuse exposed to UV light.  All chips were still packaged when received.  The first three were easy:


But 227 was received in poor condition:


Pins straightened, but pin 1 still missing.  Some debate about whether it was necessary, but couldn't get a good dump without it

Tried soldering but couldn't get anything to stick:


So ground down the package to get more grab:


Which allowed soldering on a pin (solid wire):


but this kept snapping off in the ZIF socket due to slight misalignment.  So instead fitted something more flexible:


and got a dump (after de-protecting).

Unfortunately, the protected dump indicates that the first 0x40 words were 0'd.  We hoped that de-protecting was going to shed more light on this but did not.  Its unknown if this was accidentally erased at some point, the silicon is damaged, or what.  Finally, we do not believe we accidentally programmed this.  Aside that we don't recall issuing a program command, our programmer defaults to 0xFFF, not 0x000.

139's protected dump has only 2 / 4 bits and the unprotected dump has only 3 / 12 bits.  No die damage is visible.  We do not yet have a theory as to what happened to this chip.

To summarize, 234, 241, and 242 were dumped successfully.  We believe 139 was corrupted before we got it.  Similarly, 227 was received bad and its unclear if we can fix it.  If the community has replacements for 139 or 227 we'd like to acquire them rather than spending more time investigating.

Enjoy this post?  Please support us on Patreon or Indiegogo!

Project planning

TLDR:
  • Support us on Indiegogo or Patreon if you can
  • What chips do you want to see next?
  • We might start reaching out to community for practice samples

You may have noticed we spit out a bunch of posts and then mostly went quiet.  While we've continued to move some chips through the pipeline, we've been focusing on a longer term project strategy.

The biggest issue to keep moving is ensuring sufficient funds.  Excluding existing equipment and our time, so far we've spent over $2500.  This includes supplies for a number of chips already in progress.  We love this project but need to find a balance between what we and the community contributes.

To that end, we are experimenting with fundraising platforms.  If you want to make a one time donation, support us on Indiegogo.  If you want to provide longer term monthly support, support us on Patreon.  Part of determining which chips we'll work on is what resources are available.  More resources allow us to work faster and mitigate risks.  For example, procuring practice samples before working on a rare chip.  To be clear, even if fundraising completely flops we'll continue to do what we can.

We realize that these platforms may not be ideal for everyone.  We are exploring some alternate methods such as PayPal.

Finally, we are compiling a list of chips to work on for Q1 2017.  Shout out in the comments below for what you'd like to see.

Tuesday, January 10, 2017

Chip health assessment

To provide some greater transparency, we are disclosing what we currently know about which chips that have suffered some sort of anomaly either before or after acquisition.

Warning: graphic content.  Viewer discretion is advised.

Summary

Chips are:
  • #1 (Gigas MKIII, 8748): EA blown.  Presumably this was done at factory *2
  • #7 (Joshi Volley Ball AA-002 "NEC 015", ULA): scratched during post-processing.  We have a high resolution scan before the scratch
  • #8 (Great Swordsman AA-017, 8041AH): severe die damage, believed to be pre-existing before decap.  However, the ROM was mostly intact and was photographed
  • #10 (Great Swordsman AA-013, 8741): severe leadframe damage.  Additionally, some EPROM damage that will prevent a complete dump. *1  FIB should restore most bits but may be cost prohibitive
  • #19 (Vimana, HD647180): minor bond wire defect
  • #44 (Victorious Nine A16_18.IC53): package open.  Needs damage assessment
  • #45 (Tatakae Big Fighter, 8751H): severe leadframe damage, but die was intact.  Repaired for dump
  • #50 (Guardian A68_14, 68705P5): surface damage.  EPROM / presume dead *1
  • #57 (Prebillian 7.7K, 68705P5): loose when received, but no visual damage on cursory inspection
  • #58 (Teki Paki, HD647180): minor bond wire defect
  • #59 (Tokio A71_24.IC57, 68705P5): needs assessment
  • #78 (Gals Panic CALC1, ASIC): overglass has some damage.  Pre-existing before decap?
  • #94 (Hyper Neo Geo 64 I/O controller - driving type, TMP87CH40N): bond pads corroded beyond repair *3
  • #95 (Hyper Neo Geo 64 I/O controller - fighting type, TMP87CH40N): bond pads corroded beyond repair *3
  • #96 (Hyper Neo Geo 64 I/O controller - shooting type, TMP87PH40AN): bond pads partially corroded.  We were unable to repair it, but did extract some crude dumps *1
  • #102 (Fire Shark, HD647180): minor bond wire defect
  • #104 (Crazy Fight, ULA): bond wires damaged during decap ultimately due to special silicone passivation.  Theoretically could be re-bonded
  • #123 (Bonze Adventure, C-Chip): received partial chip (missing MCU...).  The EPROM may be recoverable but probably not worth processing given we have a second chip
  • #124 (Cookie & Bibis, 87C52): die surface damaged.  EPROM / presume dead *1
  • #145 (Croupier, PIC16C74): missing leadframe pin (easy fix)
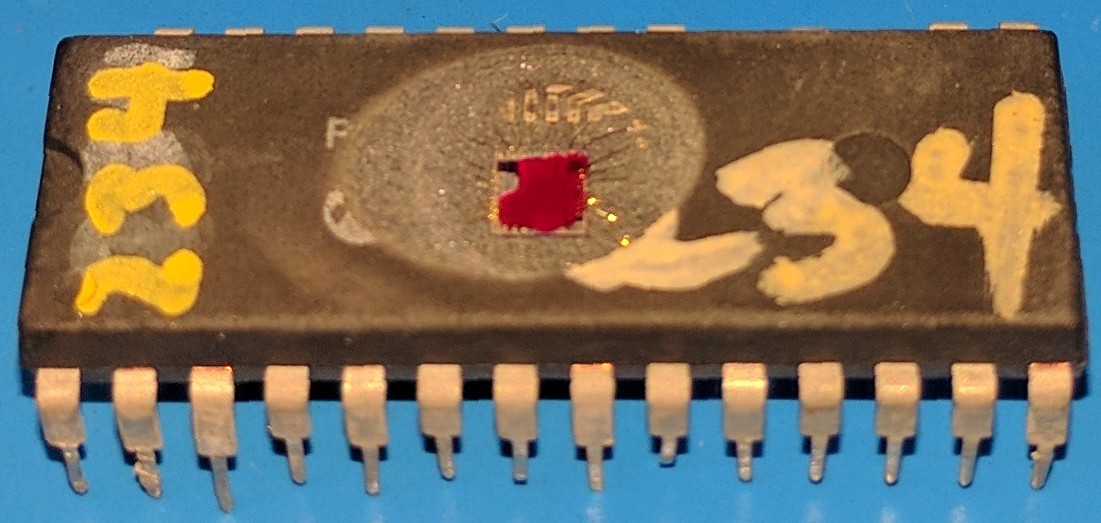
  • #195 (Tatsumi TX-1, EPROM): deep scratch.  Presume dead *1
    • Note: some confusion on this.  Actually labeled "192" but believe its 195
  • #196 (Tatsumi TX-1, EPROM): okay?  Is this worth dumping without 195?  Repairs will be time consuming
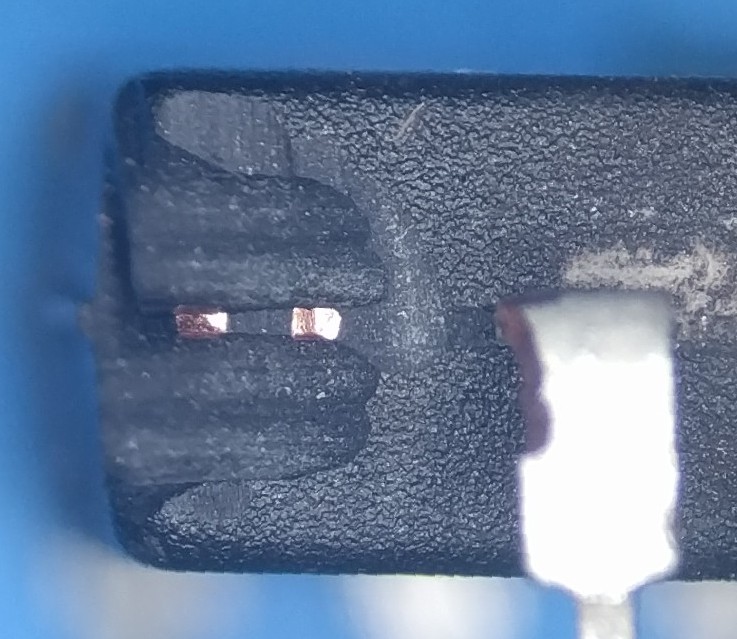
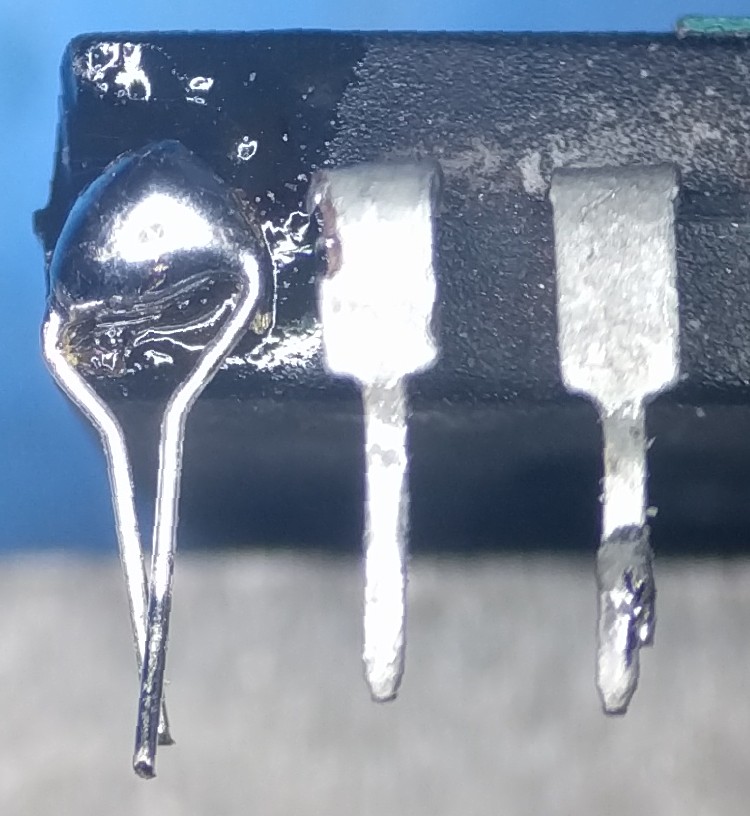
  • #204 (Bad Dudes (EI31.9A), 8751): 5 pins missing.  Bond wires in poor shape.  May be able to repair
  • #209 (Raiga (8749.7V), 8749): Doesn't read out.  EA blown? *2 
  • #223 (Tecmo Knight and Wild Fang D8749.6V, D8749HC): Doesn't read out.  EA blown? *2
  • #227 (Action Hollywood, PIC16C57): minor leadframe pin (easy fix)

The following were processed successfully to the best of our knowledge but did not result in good dumps:
  • #139: some bit lines appear to be damaged.  Observed before decap (per leaky PIC protection).  Unknown root cause.
  • #227: first 0x40 words are 0x000.  Observed before decap (per leaky PIC protection)

*1: theoretically EPROMs can be read with with things like AFM / SEM.  We haven't researched extensively but it sounds difficult

*2 we will research a workaround

*3 may be able to stain ROM.  While we've had success before, its unpredictable and would require additional practice before attempting one of these

Gallery

In more graphic detail....

#1 blown EA:


#8 cracked die:


#10 leadframe:


 #10 damaged EPROM:


#19, 58, 102 typical defect:


#19, 58, 102 typical repair:


#44:

 
#45 as received:


#45 after repair:


#50 general condition:


close up of damage:


#57 looks okay:


#59:


#78 overglass damage can be barely seen here:


 #94 typical corrosion:


#95 showing corrosion + leadframe delaminating:


#96 as received:


Its also corroded, but not as bad.  So we tried to touch up with epoxy:


but were ultimately unable to save the chip.

#104 pre-milling revealed special construction (silicone?):


This was very difficult to remove.  Nitric acid softened but did not remove it:


 After multiple acid and mechanical cycles was able to expose the die:


#123 as received:


We only have the SRAM, EPROM, and ASIC (no MCU).  Additionally, chips have damage.  For example, here are EPROM power pads:


This chip is basically considered a write off.  However, since we had nothing to lose, we attempted to power up the EPROM using silver conductive epoxy:


Which worked!  But it would require quite a few more connections to actually read out data.  Given the die also has damage that may prevent readout, effort is probably better spent on other projects.  This was, however, useful practice for the #45 repair.

#124 has some surface damage that likely makes it inoperable:


#195 ("192"):


Closing remarks

While decapping can produce great results, exposed dies are extremely fragile and require the utmost care.  To that end, all samples have been packaged in appropriate containers to keep them safe.  Its regrettable that some samples were damaged, but its unfortunately an inherent risk in this type of work.

Special packages can be difficult to deal with.  We generally deal with them by acquiring expendable test samples and practicing until we are happy with the process.  But, if we don't know what we have, we make a best effort and deal with situations as they come up.  While failures are disappointing, they are carefully studied as a lesson for future work.

Hopefully this post didn't alarm people too much.  First, hope it provides some more clarity on which chips were recovered vs which may actually produce a dump.  Second, while discomforting, we'd like to set realistic expectations that sometimes things don't work out.

On a lighter note, look forward to our upcoming post on dumping the PIC16C57s!